Working with Document Contents
Check out a document to lock it while you work. Other users can still view it, but they can’t change it until you check it back in. You can check out any electronic document, and documents without an electronic file if they’re under version control.
Tip: If a document is under version control, all of the changes that you make during a single check out will be saved in a single version.
With the Office Integration installed, Office documents are automatically checked out when you open them for editing and checked back in when you save and close them.
To check out a document manually, do one of the following:
- In the folder browser, select the document, click More (), and select Check Out Document.
- For electronic documents, right-click the document and select Check Out Document.
- For versioned documents with image pages, open the document in the document viewer, click the document name in the upper-left corner, and select Check Out Document.
Tip: To keep an Office document checked out after you close it, check it out manually before you open it.
When you are done making changes to a checked out document, check it in by selecting the document and selecting Check In Document from any of the above menus. You can also discard your changes by selecting Undo Check Out.
Checking Out a Document
You can check out a document before you begin working on it. Checking out a document will lock it so that other users can't make changes to that document until you have checked it back in, although they can still view it. All electronic documents can be checked out; in addition, documents without an electronic file can be checked out if they're under version control. When the Office Integration is installed, Microsoft Office documents are checked out automatically when you open them for editing, and will be checked back in when you save and close them.
Documents can be checked out manually by selecting the document in the folder browser, clicking the More button ( ), and selecting Check Out Document, For electronic documents, you can also right-click them and select Check Out Document. If the document has image pages, you can also check it out by opening it in the document viewer, clicking the document name in the upper left corner, and selecting Check Out Document. (You can also check out Microsoft Word documents manually in this way if you do not want them to be checked back in as soon as you close Office.)
When you are done making changes to a checked out document, you can check it in by selecting the document and selecting Check In Document from either of the same menus. You can also discard your changes by selecting Undo Check Out.
If a document is under version control, all of the changes that you make during a single check out will be saved in a single version.
Viewing Documents in Use
You can find information about documents that you currently have locked or checked out for editing in the Documents in Use list in the upper left of the folder browser. (The list will not be displayed if you do not currently have any documents locked or checked out.) The number of documents that you currently have locked or checked out will be displayed next to the list's name, allowing you to quickly tell if you have any documents reserved for you and to determine if you want to check them in, save them, or release their locks to make them available to others.
Documents will automatically appear in this list if you have manually checked them out, if you have opened them for editing using the Microsoft Office Integration, or if you have made a change to their pages or metadata and not saved it yet. Documents that have been checked out will be displayed with a pencil icon, while documents that have been locked for editing will be displayed with a lock icon.
Checked out documents can be checked back in (which will save your changes) by selecting the document and clicking the Check In Document icon or right-clicking and selecting Check In Document. If you want to discard your changes instead of saving them, you can instead select Undo Check Out.
Locked documents can be saved by locating the document and saving its changes. If you want to discard your changes (for instance, if the document's lock was not correctly released), you can select the document and click the Release Lock icon.
Working with Image Pages
If you are working with a document that contains pages (including PDFs, but not including documents with an electronic file such as a Word document or Excel spreadsheet), you can rearrange those pages, move them from one document to another, use them to create a new document, or delete them.
Once you have made a change to a document, until you save it, it will be locked for editing and cannot be modified by other users. It will also appear in the Documents in Use section of your repository.
Rearranging Pages
You can rearrange pages within your documents, either in the folder browser or in the document viewer. In the folder browser, the page thumbnails will be on the right, in the Preview tab; select the Thumbnails button to view the pages as thumbnails. In the document viewer, thumbnails will be on the left. To rearrange them, select a page or pages and drag it, then drop it where you want to place it.
Rotating Pages
If a page is accidentally scanned sideways or upside-down, you can rotate it to its correct orientation. To rotate a page, select the page and click the Rotate Clockwise button, or right-click the page and select Rotate Clockwise. Continue to do this until the page is correctly rotated.
Moving Pages Between Documents
You can move pages between documents in the folder browser. Select a document and then click the Thumbnails tab on the right to display the page thumbnails. Select a page or pages, then drag it onto a document to move the pages into the document, or onto a folder to create a new document with those pages in the specified folder.
You can also move or copy pages by selecting the pages and then clicking the Move Pages To ( ) or Copy Pages To (
 ) button, or selecting and right-clicking the page thumbnails, and navigating to the location where you want to move the pages.
Generating Pages from PDFs
By default, pages will be generated from PDFs when they're imported into the repository, allowing you to use Laserfiche annotations on the contents, rearrange and rotate pages, and use other document viewer tools. If a PDF has been imported into the repository without pages generated, or if you need to update the pages, you can manually generate pages.
To do so, select the PDF document in the folder browser. Click the More button () and select Generate Pages. If the document already has pages, you will be prompted to confirm that you want to overwrite those existing pages.
Deleting Pages
To delete pages, open the document in the document viewer and select the thumbnail for the page or pages you want to delete. Press the DELETE key. Deleted pages will go to the recycle bin; see Deleting Documents and Folders for more information.
Working with Microsoft Office Documents
Laserfiche offers two ways to work with Office documents: seamlessly in the Repository Web Client document viewer through Office for the web, or by checking out a document and using the desktop version of the Office application.
Using Office for the web requires an administrator to configure it (see Editing with Office for the web for more information), but no user setup. Simply select Edit With then Microsoft Word for the web.
Tip: you can open an Office document directly in Edit mode using the context menu.
If you instead need to use the desktop version of the Office applications, selecting the second option from the Edit menu will use the Laserfiche Office Integration tray app to open the document locally.
The Laserfiche Office Integration tray app is a Laserfiche component that allows users to work with Microsoft Word documents, Excel spreadsheets, and PowerPoint presentations from their repository in the native Microsoft Office applications for Windows.
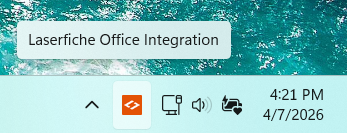
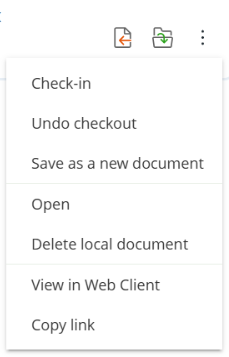
The tray app allows users to check in, check out, and perform other operations on documents they have downloaded locally.
Note: The Repository Desktop Client does not use the tray app. All functions are performed from within the Laserfiche ribbon in Microsoft Office applications.
 See a video on the Laserfiche Office Integration tray app
Learn how to work with Laserfiche documents directly from Microsoft Office applications. The Laserfiche Office Integration tray app allows you to save, update, version, and email documents while keeping content and metadata synchronized with the repository.
Installing the Laserfiche Office Integration tray app
If you have never used the Laserfiche Office Integration on your workstation before, you will need to install it.
- In the repository, open any Microsoft Office document.
- When prompted, download the installer, then run it.
- If the installer prompts you, close your Office applications or restart your computer. Otherwise, close and re-open any Office applications after the installation finishes.
Making Changes to a Microsoft Office Document
After you install the Office Integration, open an Office document by selecting it in the folder browser. The document opens in the appropriate Office application, where you can edit the document. While a document is checked out, you (and only you) can also edit the metadata in the Repository Web Client.
How the document is checked back in depends on how you opened it:
- Edit with…: the document is checked in automatically when you close it.
- Check Out Document: the document stays checked out until you click Check In in the tray app.
Tip: you can also check in a document or undo the checkout from the Repository Web Client.
To see all documents you've checked out locally, click the Laserfiche icon in the Windows System tray. Local copies are deleted automatically once they're no longer needed.
Saving to Laserfiche from a Microsoft Office Application
The Save to Laserfiche button is used when adding a document to the repository for the first time. This button is shown on the Home ribbon of Office applications by default when the add-in is installed.
Note: An administrator must deploy the add-in before it appears in your Office apps. If you don't see the add-in, contact your Laserfiche or Microsoft 365 administrator.
Once a document is saved to the repository, all further editing is managed through the tray app. After saving to the repository, the add-in will provide a link to the document in the Web Client, and you can open that copy of the document to continue working. See "Making Changes to a Microsoft Office Document" above.
Note: when using the legacy plug-in version of the Office Integration, it will appear as a separate Laserfiche ribbon. This ribbon will not be shown when working with existing Laserfiche documents from the Repository Web Client, and all actions will be performed from the tray app.
Working in the Repository Desktop Client
The Laserfiche Office Integration has a number of features to help you work with your documents. To access them in your Office application, select the Laserfiche tab in the ribbon. You can choose to immediately save the document to Laserfiche, manually check it in, make version comments if the document is under version control, and modify field, tag, version, and link information directly from the Laserfiche Office Integration. You can also add tokens to your Office document that will draw information directly from your repository, such as the document's name or creator, and field values.
Note: Editing metadata and using tokens from the repository are not available for the Repository Web Client Office integration at this time. You can use the View in Web Client option to easily open the corresponding document in the Repository Web Client to work with metadata.
Working with Audio and Video Files
In addition to allowing you to view audio and videos directly in the browser, Laserfiche can also transcribe audio and video files. This makes their content searchable, and can be viewed side-by-side with the video. See Working with Audio and Video Files for more information.
Working with Other Electronic Files
You can make changes to other types of electronic files by checking out the document and opening it for editing. The document will be saved locally on your computer. When you are done making changes, check the document back in. You will be prompted to upload the updated version of the document, which will replace the existing file.
Working with Document Metadata
All documents and folders contain various metadata, including both user-created metadata such as fields, tags, links, and versions, and other information such as the document's name, location, creation and modification date, and so on. For more information on working with document metadata, see Metadata.
Once you have made a change to a document, until you save it, it will be locked for editing and cannot be modified by other users. It will also appear in the Documents in Use section of your repository.
Generating Document Text
By default, Laserfiche will automatically try to generate text from electronic files and PDFs when they are imported into the repository. A background service monitors for newly imported documents and queues newly created documents for OCR. In addition, text will be generated for scanned documents, documents printed using Snapshot, and documents imported using Import Agent.
If you need to update the text, you can manually generate text. To do so, select the document in the folder browser. Click the More button () and select Generate Text. If the document already has pages, you will be prompted to confirm that you want to overwrite those existing pages.
Note: Text cannot be generated for documents with pages but without an electronic file or PDF portion if they are already in the repository.
The text generation process runs in the background and results may not be immediately available. Larger documents may be processed in chunks. For documents under version control, you may see several versions created as text is generated.
Working with Document Summaries
When working with documents in the repository, users may want to quickly verify that they have found the correct document in the repository without needing to open and read it. Document summarization, powered by Laserfiche AI, allows you to generate a summary of the document that can be viewed when browsing in the folder browser or when viewing documents in the document viewer. The summary can also be included when generating a URL for a document or sending a document via email.
For more information, see Document Summarization.
Asking Laserfiche AI About Your Documents
Smart Chat is a Laserfiche AI chatbot that enables you to find information and insights about your documents and folders, and perform actions on them, by typing simple, natural-language questions. Smart Chat can also answer questions about Laserfiche in general. For more information, see Smart Chat.