Dynamic Fields
Dynamic fields are fields that change depending on the situation or on what a user selects or enters in another field. For instance, an employee-record repository template might include first name, last name, employee ID, phone numbers, addresses, eligibility statuses, and other details. A dynamic field example would be selecting a first name and then a last name from drop-down lists; once both are selected, most of the employee details could auto-populate from a table or database, or even from a web service that hosts the necessary data. If the employee has multiple phone numbers or addresses on file, additional fields may be shown and populated.
In other cases, the employee's length of employment might make certain fields available over time. For example, after 90 days, the employee may be eligible to opt into company insurance, so a check-box field for "has elected insurance coverage" is displayed when it was not available prior to the 90 day point. If the employee is married, selecting that option might expose additional required fields for spouse information. There are many other ways to make metadata entry a dynamic experience based on what the user selects, fills in, or updates - making data entry easier and reducing opportunities for errors.
This document covers how to create and manage the connections between fields and data to enable this.
Setting Dynamic Fields on Documents or Folders
Dynamic fields are set or modified just like list fields: select a value from the field's drop-down in the fields tab, see fields appear or disappear, or watch as a field value is entered after completing another set of fields. (See Viewing, Assigning, and Modifying Fields and Templates on Documents and Folders for more information on setting field values.) Depending on how the fields are related, values must be assigned to them in order. In some cases, additional fields may depend on more than one parent field (such as a "City" field that depends on both "Country" and "State or Province"), in which case all of the parent fields must be filled in before the child field can.
If a dynamic field is configured such that only one value is possible once the parent fields have been filled in, that value will automatically be filled in the child field. For example, if you have "Employee Name" and "Email Address" fields bound to the "Employee ID" field, and the "Employee ID" field is unique, the employee name and email address will automatically be populated.
Planning a Template with Dynamic Fields
While creating the template and setting out fields to collect data, consider the following:
- Is the information consistent with the variety of documents the template will be applied to?
- If using a list of selectable values, will the list be updated on a regular basis? Or used across multiple templates?
- Is the information to be collected contingent upon other data collected in the form?
- Are any data points only needed if another data point is of a specific value?
- Can more granular data fields be combined for additional fields?
- Do the values to be collected exist in another location, like a database, table, or from a web service?
Once a plan is in place for how the various fields relate to each other, then begin preparing the underlying connections to make the fields dynamic.
Laserfiche Tools for Dynamic Fields
Within the repository metadata administration area, the following tools are available to create a more dynamic experience for users:
- While editing a template in the designer:
- Display rules
- Data lookups in the template designer
- Using lookup tables via query rule
- Using an external database via query rule
- Using a web service via web request rule
- Field formulas
- With a template selected in the repository metadata administration page:
- Using lookup tables via classic dynamic fields
Retrieving Stored Data for Fields
If the information will be from a simple list that will be updated or used across multiple templates, create a Process Automation Lookup Table to make the list easy to maintain and access from multiple locations using a query rule. If the information is stored in a database, then a direct connection can be established and used with another query rule. If the data can be retrieved from a web service, then a web-request rule would be used to connect to and make the request of the service. See the Process Automation Lookup Table and Rules documentation pages for more details.
Field Relationships for Data Filtering
Any collection of information where one value is associated with another can be turned into related dynamic fields. Dynamic fields can also be created where one piece of information controls more than one other related field. Below are some examples of using this kind of information for using stored data, and how tables can be set up to reflect it. The following examples use lookup tables for data storage. As lookup tables support the import of Microsoft Excel and CSV files, prepare the required data in a spreadsheet program that can export files of those types, or use an existing Microsoft Excel or CSV file.
Note: Because lookup tables are being used for data management, the service limits for lookup tables apply to these types of dynamic fields. See Service Limits for more information.
 Example: Simple hierarchy of fields
Dynamic fields may be used to filter a list of employees by department, so that once a department has been chosen, only those employees that are part of that department can be selected. Begin with a list like the one below. If the following list is used as the initial field, then when the HR department is selected, Tanya Wu and Pat Tomson would be the only available selections in the related employee field.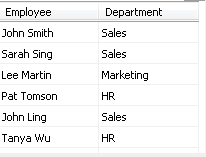
Example: Fields linked to multiple parent fields
In some cases, linking to more than two pieces of information from a single field is needed. For instance, when creating a set of fields to track car manufacturers, models, and years, such that if a Dodge was selected in the manufacturer field, only Dodge models would appear in the models field; once Dodge and Caravan were selected, then only years relevant to Dodge Caravan automobiles would appear in the years field. A list like the following would be used: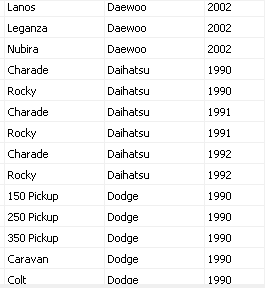
Affecting Field Display and Behavior
Fields can be selectively shown, hidden, or made to be required or not depending on values set in other fields. For example, invoices over a certain amount might require additional information for approval. Or a field might need to be required when a fee has been marked as waived, forcing the user to provide additional information, but leave that additional information field optional when it has not. This can be accomplished dynamically using Display Rules.
Combining Field Data into a Single Field
When the available data is more granular than desired, or analysis is desired, fields can have the values combined for performing logic, date, and math formulas to be displayed in another field. once the other fields have been filled, the result of the formula is displayed. This can be a concatenated (combined) string, like a "lastname, first name" structure, a future date to be used for additional processing, or a new value like a sum, average, or many other possibilities.
Locating the Dynamic Template Features
Several of the dynamic field features are located within the template designer, providing easy access, editing, and application of the features to fields while laying out the fields in the positions desired. These are located on two tabs, along with the Properties tab. The first is the Dynamic tab. This tab contains the controls for adding and managing the Display rules and Data lookups. The Advanced tab contains the Field formulas controls. Display rules and data lookups are described below. To learn more about field formulas and what formulas are available, see the Field formulas topic.
Another method for looking up data using Process Automation Lookup Tables, classic Dynamic Fields, is located in the repository metadata administration page when a template is selected. Classic Dynamic Fields are described below as well.
Display Rules
Display rules allow you to selectively display, hide, or require fields depending on values set in other fields. For example, invoices over a certain amount might require additional information for approval. You could create a display rule that displays fields for that additional information if the total price or value is greater than the specified amount. Alternately, you might want to require a user to provide additional information when a fee has been marked as waived, but leave that additional information field optional when it has not.
Note: This function was previously called "field rules." The functionality has not changed.
To create a display rule in the template designer:
- Select the Dynamic tab in the right pane.
- Under Display Rules, click Add rule.
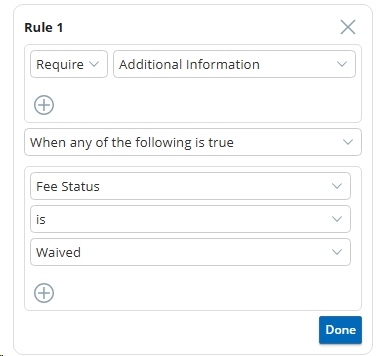
- Specify whether to Show or Hide the target field or fields based on the rule. You can also select Require if you want a field to be marked as required when certain criteria are met.
- Select a field to show or hide; you can use the Add new field button to specify multiple fields.
Once you have specified one or more target fields, you can set the rules that determine when those fields are displayed or required based on one or more criterion fields. Specify whether to apply the rule When any of the following is true, When all of the following are true, or Always. You can then specify one or more criterion fields and the values that will cause the rule to take effect.
Multiple display rules are evaluated top-down, with rules lower in the list taking precedence over rules higher in the list if there is a conflict.
Display rules can be used with individual fields, sections, tables, and static text.
Example: Display fields based on a radio button choice
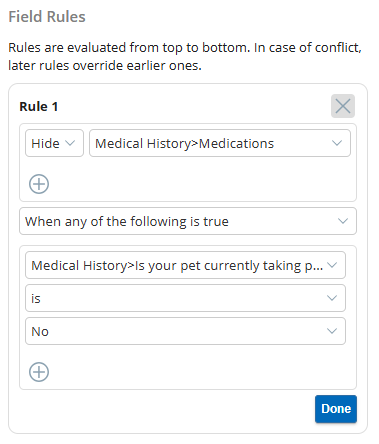
A veterinary office's pet information template contains a question regarding whether the pet is currently taking prescription medicine. If "Yes" is selected, the template should display additional options for the medicine's name, dosage, and how long the animal has been taking it. The office configures a display rule to hide these fields unless "Yes" is selected.
Example: Display explanatory text when a field value is specified
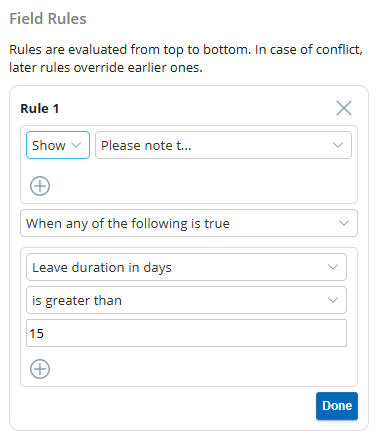
A template used in a leave approval process includes the number of days off requested. The company's HR department wants to notify employees that approval times may be longer if the requested time off is more than fifteen days, so they create a rule to display a note to that effect.
Example: Require fields based on a field value
A template is used to store information about youth sports applications. The Fee field can have three possible statuses: Paid, Pending, and Waived. If the status is set to Waived, the Additional Information field must be filled in; if the status is set to Paid or Pending, the field should be optional. The department creates a required field display rule to accomplish this.
Data Lookups
Data lookups allow a field to be filled from a data source, controlling what values are allowed to be selected for that field. Data sources can include Laserfiche lookup tables, external (SQL Server) data sources, or data retrieved from web requests. These data sources are accessed through Process Automation Rules, specifically query rules and web request rules.
Note: While a data lookup can populate any field type with a selectable list of values, the data type contained within the list must match the data type specified by the field. When a field is populated from a data lookup, it will appear as a drop-down list when the user is making a selection.
Before creating either pre-populated or linked fields, plan where the values users will be allowed to select will come from. Typical data provides a fixed list of values, like the year, make, and model of a car. If using linked fields, an initial selection can filter subsequent fields to only relevant values based on the earlier selection. For instance, a car model field might be limited to only available models for the year and make selected earlier in the template. See Linking Fields below for more information.
Note: Service limits apply depending on the data source and type of rule used. Please see the service limits documentation for the elements used in your fields.
Pre-populating Fields With Data
The most basic use for a data lookup is to pre-populate a field to use as a drop-down list for selection. If you plan to link fields, where the value of a given field controls the values available in subsequent fields, this is the required first step, and is used to create the "parent" field.
Linking Fields
You can link fields into a "parent/child" structure, where the value selected for one field controls the values available for selection in subsequent fields. When linked, selecting a value from the available options in a "parent" field determines what values are available in the "child" fields. Linked fields can contain multiple levels (for instance, only displaying the available states or provinces for a particular country once the Country has been selected), or can depend on more than one "parent" field (for instance, only displaying models relevant to a particular combination of car manufacturer and year).
Note: This is similar to classic Dynamic Fields. However, data lookups support additional data sources and are managed within the template designer.
Important: You will not be able to add new data lookups until all classic dynamic fields have been removed from the template.
Creating Data Lookups
To use a data lookup on a field,
- Create the rules in Process Automation for retrieving the data.
Note: In the initial release, each field will require a rule that returns a single column of data.
Important: The rules and if used, any lookup tables, must be created in the Process Automation Global project. Rules created in other projects will not be accessible to data lookups.
- In the template designer, create your template layout with fields arranged as desired.
- [Optional] Select the field to be populated with a list from a data lookup. The field can also be set in the process of configuring the lookup.
- Click the Dynamic tab in the right pane.
- Under Data Lookups, click Add Rule.
- Select the type of rule you will be using:
- Use a Data Query Rule to retrieve values from a database (SQL Server).
- Use a Web Request Rule to retrieve values from a web service.
- Use a Lookup Table Query Rule to retrieve values from a Laserfiche Process Automation lookup table.
Note: The Data Query Rule and Table Query Rule both use the Query rule type in Process Automation. Query rules can be configured to either access Process Automation Lookup Tables, or external data sources like a SQL Server database.
- Select the rule you wish to use.
- [Optional] Select the rule version that is required.
- Depending on the specifics of the rule, complete the following:
- Select the "parent" Field or fields to be used for the Input Parameter or parameters that will filter the data.
- Select the Output Parameter, or table column name, to fill the field with.
- If not initially selected in step 3, select the Field to be filled by the rule.
- To prevent an automated process from changing a field value, select the Restrict Values checkbox.
- Click Done to save the changes.
Viewing, Editing, or Deleting Display Rules and Data Lookups
To view all display rules and data lookups used on a template, select the canvas where there are no fields, and then select the Dynamic tab. Each section will contain all currently assigned rules.
To edit a rule of either group, select the edit icon next to the rule.
To delete a rule, click the delete icon.
To open the Process Automation Rules page to create or edit rules, click Manage Rules in the Data Lookups section.
Field Formulas
Field formulas automatically calculate values based on data from other fields, enabling operations like text concatenation, number calculations, and date math. They calculate when source fields are populated and can be configured to always update or fill only empty fields. Read-only protection prevents manual edits to calculated values. To learn more about field formulas and what formulas are available, see the Field formulas topic.
Note: Formulas work only in the repository web client.
Classic Dynamic Fields
Once the dynamic field information has been created as a lookup table, fields can be added to a template. There are three basic steps for adding dynamic fields to a template. First, add the fields to be handled dynamically to the template. Both the parent fields and the child fields must be added. Second, associate the fields with columns in the lookup table. Finally, specify which fields depend on which other fields.
Note: You will not be able to add "dynamic fields" to a template if data lookups have been used on that template. Classic dynamic fields are provisionally supported, but it is highly recommended that the newer data lookups features be used moving forward, and converting to data lookups when it is possible to do so.
Important: When creating or modifying a lookup table for use with a dynamic field, be sure to select the Enable for Dynamic Fields option for the table.
- Before beginning, create the fields to use for the dynamic field (both parent and child fields). Only fields that already exist can be configured as dynamic fields.
- Open the app picker in the upper right corner, and select Repository Administration.
- Under Metadata, select Templates.
- Select the template to add dynamic fields to, or create a new template. (See Creating and Modifying Template Definitions for more information on template creation.)
- On the General tab, add the fields for dynamic handling to the template. Both the parent fields and the child fields must be added.
- Open the Dynamic Fields tab, and add a field using the Insert Field button.
- Set the properties for the dynamic field:
- In the Name option, select the field in the template to manage dynamically.
- In the External table option, select the lookup table in which the information is stored.
- In the External column option, select the column that corresponds to the field selected.
- In the Parent Fields option, select the field or fields that will determine the possible contents of this field. (If this is the field that will determine the possible contents of other fields, and is not itself bound to any other fields, leave this option blank.)
- In the Sort direction field, select Ascending or Descending.
- Optional: The Restrict values option determines the behavior of the field when accessed using the Laserfiche SDK or another application such as Quick Fields. If you select False, external applications will be able to save values to that field even if they do not exactly match the values in the external table. For example, if you have a Quick Fields session attempting to store a value obtained via OCR it would be able to save that value even if it contained a small mismatch due to an OCR inaccuracy. If you select True, the value must match the value in the external table exactly, or it cannot be saved. This value is recommended when dynamic fields are used for data verification. If unsure which option to select, it is recommend to leave it set to the default, False.
- Repeat steps 6-7 for each additional field that will be handled dynamically.
- When you are finished, save the template definition.
Free Training: Metadata Administration in Laserfiche Cloud eLearning course in Aspire.