Fields and Templates
Fields and templates are metadata types that allow you to store, search for, and retrieve information about documents and folders. A field contains a piece of information about a document, such as an author name, an invoice number, a document category, a phone number, or an address. A template is a collection of related fields; assigning a template to an entry allows you to assign multiple related field at once. Laserfiche comes with some default templates, which you can add to or modify to store any information that is important to your documents.
Field and template information has several purposes. It can provide a quick overview of the content or important identifying characteristics of a document or folder, such as the document type or category, or the document's author. It also makes it easier to search for an item: you can search for a document or folder by its template or its field values, allowing you to quickly locate documents based on information such as an invoice number or customer name. Fields and templates also allow you to store additional information with the document, such as a customer email address or phone number.
Before a field or a template can be applied to a document, it must be defined in Repository Administration. Laserfiche provides you with two starting templates: General, which contains general information about documents, and Email, which contains information specific to imported emails. You can modify these templates to better suit your needs, and you can add additional templates and fields specific to your repository. See Creating and Modifying Field and Template Definitions, below, for more information.
Viewing, Assigning, and Modifying Fields and Templates on Documents and Folders
You can view the currently-assigned field and template information, add or change fields or templates, or update field information from the right pane of both the document viewer and the folder browser.
- Select a document or folder in the folder browser, or open a document in the document viewer. In the details pane, select Fields .
- Any currently-assigned template and field information will be displayed. If no template has yet been assigned to the document, it will say No template assigned.
- To set a template:
- To manually apply a template, or change the current template to a different template, open the Template drop-down menu and select the template you want to apply to the document. Changing or removing a template will also remove all of the field information associated with that template, unless you change to another template with the same fields.
- To automatically apply a template, select Automatically select template and extract values (
 ). A template will automatically be selected from the list of templates eligible for automatic selection. Note that this option is only available for documents that do not have a template currently applied; to use it with a document that already has a template, you must first remove that template. See Smart Fields with Classification, below, for more information.
- To set field values:
- To display a field separate from a template, click Add/remove fields. Select the field or fields you want to add and click Apply.
- To assign a field value to a document, or modify an existing field value, type a value in the box (or, if it is a dropdown, radio button, or checkbox, select it from the list).
- If the template includes fields that are configured for automatic extraction, click Extract values (
 ) to process document text and automatically fill in appropriate field values by taking advantage of Smart Fields powered by Laserfiche AI.
 - If the field is a multi-value field, once you type a value, another box will appear to allow you to type an additional value.
- Dynamic fields determine the values displayed in other fields. For example, if you select a particular country in a "Country" field, the corresponding "State or Province" field would only show valid states or provinces for that country.
- Dropdown, radio button, and checkbox fields may contain an option to specify an alternate value. If this is the case, when the "Other" option is selected, you will be prompted to provide that information.
- If a template is designed using field rules, the fields that you can view and modify may change depending on the values set in other fields. For example, you might choose to display an approval field if an invoice cost is over a certain dollar amount.
- You can use tokens to automatically populate field values.
- If the template includes fields that are configured for automatic extraction, click Extract values (
- To remove an independently-added field, click Add/remove fields. Currently-applied fields will be listed at the top. Clear the fields you want to remove and click Apply. Removing a field will delete the value associated with that field.
- Save your changes to the document.
Note: Required fields are marked with a red asterisk. A template cannot be saved unless its required fields are all populated.
You can modify the field and template information applied to multiple entries (documents and folders) by selecting more than one entry in the folder browser. This allows you to set template and field information for multiple entries at once. If the selected entries already have an assigned template, the template will be listed. If they have multiple, different templates assigned , the Template drop-down will list "Multiple templates assigned." Changing the template will cause all original template field information to be lost, unless both templates share the same field. If documents have the same field with the same value assigned (including no value), the value will be displayed; if they have the same field but with different values, the field will display "Entries have different values assigned." Changing a value will save that value for all selected documents, even if that would overwrite existing values. Adding a new, individual field will apply that field and its new value to all selected documents, but will not affect any other field or template information.
Disabled Fields and Field Security
When working with field data, you may run across fields that are disabled, or grayed out. A disabled field indicates you do not have sufficient rights to make changes to that field. However, you are allowed to view the information in that field. Fields may also be disabled if a document has been checked out by another user.
Field security is configured in Repository Administration. See Field and Template Rights for more information.
Creating and Modifying Fields and Templates
Before users can apply fields and templates to entries, the definitions for those fields and templates must be created. Laserfiche provides you with two starting templates: General, which contains general information about documents, and Email, which contains information specific to imported emails. You can modify these templates to better suit your needs, and you can add additional templates and fields specific to your repository.
Before creating a new template or field, you should first consider its purpose: what type of information it will store, in what format will it be stored, and how will that information be used in the future. This will help you determine how to configure the field, and will ensure that you are capturing the correct information without storing extraneous information. See Metadata Design Best Practices for more information.
Using the Template Designer
To begin creating or modifying a template and associated fields using the template designer, perform the following steps:
-
Open Repository Administration in the Web Client and select Metadata, then select Templates.
-
Select a template, or select the Add button to create a new template.
-
Under Properties or in the Add Template dialog box, specify the following:
-
Name: The template's name
-
Select the Eligible for automatic selection with Smart Fields option to add this template to the list of templates that can be automatically applied to a document. See Smart Fields with Classification, below, for more information.
-
Description: A brief description of the template. This will be displayed to other administrators when working with the template definition. You must provide a description when the Automatically Extract Value option is selected. Smart Fields with Classification powered by Laserfiche AI uses this description to properly determine whether the template is relevant to a particular document. For best performance, provide a comprehensive description of the template and what types of documents it should apply to.
-
Color: A color associated with the template. The color will display alongside documents and folders with that template assigned for easy identification.
-
-
Click OK to create or update the template.
Adding Fields
The template designer provides a simple drag-and-drop interface for creating a template. On the left, you can choose Existing Fields to select a field that has already been created in the repository, or Create Fields to create a new field. When creating a new field, you will first need to select a type for the field; see Field Types, below, for more information.
Drag the field into the central designer pane. You can arrange and rearrange the fields however you like by dragging and dropping, including placing fields side-by-side or using formatting elements. You can also use the Duplicate button to create a copy of the field, or the Delete button to remove the field from the template.
The field's properties will be displayed in the left pane. Fields have the following available properties and options:
-
Field name: The name of the field. This name is unique in the repository and will apply to the field regardless of what template it is part of or whether it is part of a template at all.
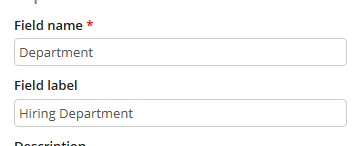
- Field label (optional): The label that will be displayed for the field in this template; the field label is not shared with other templates that contain the same filed. Field labels can be used to provide contextual information about the field specific to the template.
 Show me an example.
An organization uses a single "Department" field, shared in all templates that require that information. This allows them to keep the list of departments consistent and up to date across multiple templates without needing to update the list in multiple places. However, an HR manager creating an application template might choose to apply the field label "Hiring Department" to the field on that template only in order to proivide context to users filling out the template.
-
Select the Automatically extract values option to allow Laserfiche AI to attempt to automatically fill in a value for the field based on the content of a document. See Smart Fields, below, for more information.
-
Description: A brief description of the field. This will be displayed to other administrators when working with the template definition. You must provide a description when the Automatically Extract Value option is selected. Smart Fields powered by Laserfiche AI uses this description to properly extract the desired information on a document. For best performance, provide a comprehensive description of the value you'd like to automatically extract from the document.
-
Default value: The default value for the field. You can set this as a static value, or as a token.
-
Allow multiple values: Determines whether the field is a multi-value field. See Multi-Value Fields, below, for more information.
-
Required: Determines whether the field is required. Fields can be set as required in two ways: required for all templates and required for this template. For more information, see Required Fields, below.
-
Indexed: Determines how the search engine will handle searches for this field, which in turn determines what options are available for searching on field values. See Indexing Fields for details.
-
Character limit (text and list fields only): The maximum size of the value that can be stored in the field.
-
Allow multiple lines (text fields only): Determines whether the text box will display as a multi-line box by default or will only expand as it is populated.
-
Format (date and number fields only: You can customize the way that Laserfiche displays date, time and number field values. This customizing can be done on a field-by-field basis. For example, you might choose to display a number field as currency (so that the value "345.98" will be displayed as "$345.98"). See Custom Field Display Formats for more information.
-
Constraints (text and number fields only): Text and number fields can be constrained to a certain format or range of values to ensure consistency in how a value is specified across your organization. For example, you might want to ensure that all phone numbers are input in the format 123-456-7890. Similarly, you might have a number field to store four-digit invoice numbers, and want to ensure that all values in that field fall between 1000 and 9999. See Custom Field Constraints for more information.
-
Options (list fields only): The values that can be selected for a list field (checkboxes, drop-down lists, and radio buttons). See List Field Types, below, for more information.
Adding Formatting Elements
In addition to being able to drag and drop fields into whatever configuration works best for your information, you can add additional formatting elements to make the template clearer and easier to use.
-
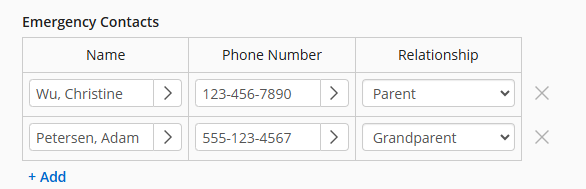
Table: The table element allows you to display multi-value fields in a table to make them easy to read. To do so, drag the Table formatting element into your template, and then drag the multi-value fields into it side-by-side. You can also set a Group name for the table.
Show me an example.
A summer camp stores information about each camper in a template. Among the information collected are the name, phone numbers, and relationship of the child's contacts. The organization uses a table to format this information in a way that is easy to understand at a glance.
-
Section: Section breaks split templates into collapsible parts. You can set a name for each section to provide context to the fields within that section.
-
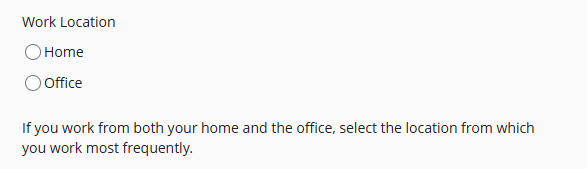
Static text: Static text will display as written to users populating the template. You can use static text to provide additional information or instructions for filling the template.
Show me an example.
A template containing employee information includes a field for the location from which the employee works. Employees are sometimes unsure what to select if they work partially from home and partially from the office, and so the manager configuring the template adds static text explaining what to do in that situation.
Note: Checkboxes and radio buttons will automatically be displayed as drop-down lists when added to a table. In addition, fields that have not been configured as multi-value fields cannot be added to tables.
Field Rules
Field rules allow you to selectively display, hide, or require fields depending on values set in other fields. For example, invoices over a certain amount might require additional information for approval. You could create a field rule that displays fields for that additional information if the total price value greater than the specified amount. Alternately, you might want to require a user to provide additional information when a fee has been marked as waived, but leave that additional information field optional when it has not.
To create a field rule in the template designer, select Rules in the right pane. Specify whether to Show or Hide the target field or fields based on the rule. You can also select Require if you want a field to be marked as required when certain criteria is met. Select a field to show or hide; you can use the Add new field button to specify multiple fields.
Once you have specified one or more target fields, you can set the rules that determine when those fields are displayed or required based on one or more criterion fields. Specify whether to apply the rule When any of the following is true, When all of the following is true, or Always. You can then specify one or more criterion fields. and the values that will cause the rule to take effect.
Multiple field rules are evaluated top-down, with rules lower in the list taking precedence over rules higher in the list in case of conflicts.
Field rules can be used with individual fields, sections, tables, and static text.
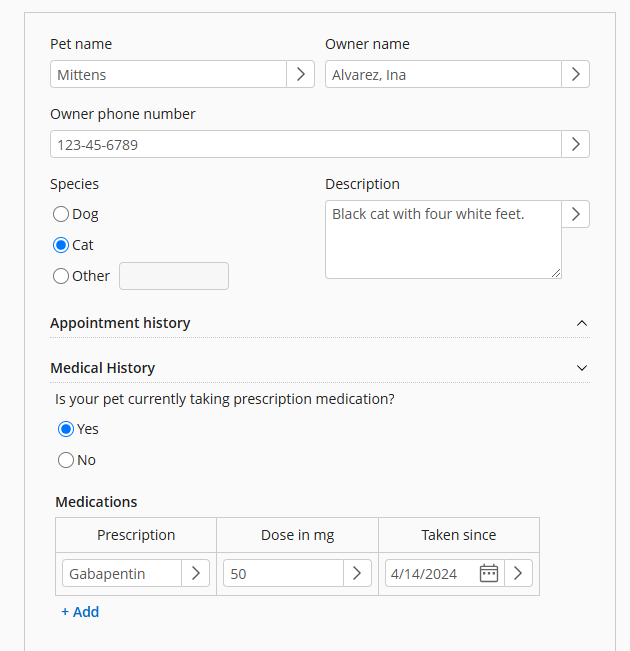
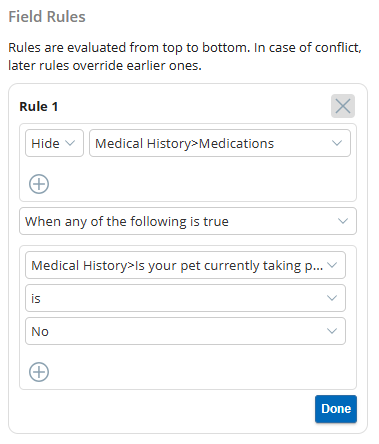
A veterinary office's pet information template contains a question regarding whether the pet is currently taking prescription medicine. If "Yes" is selected, the template should display additional options for the medicine's name, dosage, and how long the animal has been taking it. The office configures a field rule to hide these fields unless "Yes" is selected.
A template used in a leave approval process includes the number of days off requested. The company's HR department wants to notify employees that approval times may be longer if the requested time off is more than fifteen days, so they create a rule to display a note to that effect.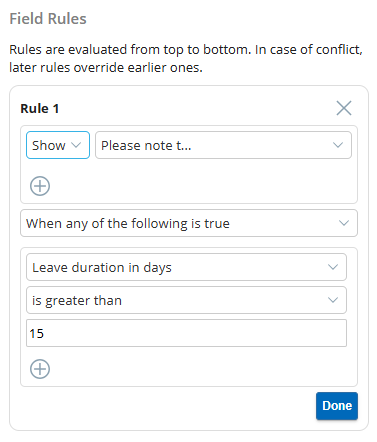
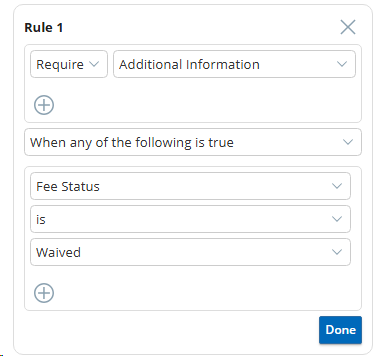
A template is used to store information about youth sports applications. The Fee field can have three possible statuses: Paid, Pending, and Waived. If the status is set to Waived, the Additional Information field must be filled in; if the status is set to Paid or Pending, the field should be optional. The department creates a required field rule to accomplish this.
Field Types
A field's type determines what kind of information can be stored in that field. For instance, a text field can contain any combination of characters, but a number field can only contain numbers. In addition, the field type determines how the information in the field will be sorted when displayed in columns. A field's type is determined when the field is created.
Laserfiche supports the following field types:
- Text: The Text type is the most permissive type of field. Any character can be entered into it. By default, the only limitation Text fields have is the width or number of characters that can be assigned to it. The width is set when the field is created.
- List: A List field type allows you to select a value from a predefined list. The values available from this list and the order in which they appear are configured when the field is created. List fields can be displayed as checkboxes, drop-downs, or radio buttons; see List Field Types, below, for more information.
- Number: Only number values, including decimals and negative numbers, can be type into a Number field. A number value must fall within the following range: -9,999,999,999,999.999 and 9,999,999,999,999.999. Number fields support up to five places after a decimal point (e.g., 0.00001).
- Date: Only date values can be specified for a Date field type. A date value must be formatted using short date format (e.g., 06/05/2014).
- Date/Time: A Date/Time field allows you to specify date/time values. A date/time value must be formatted using short date format followed by the time (e.g., 06/05/2014 06:00:00 PM).
List Field Types
A List field type allows you to select a value from a predefined list. List fields can be displayed in three ways: as a checkbox, as a drop-down, or as a radio button. They are configured in the same way, but display differently to make them easier for users to set. For example, if a list field contains a large number of possible values, it should be configured as a drop-down to save space on a template, whereas a list field with a short number of possible values from which the user should pick one would be better displayed as a radio button.
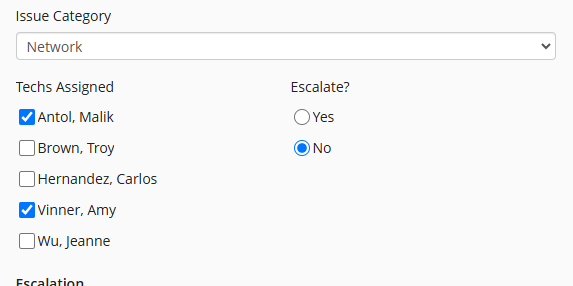
The IT department at an organization has a template for issues they receive. Among other things, the template captures the category of issue, which techs are assigned, and whether the issue has been escalated. Though these are all list fields, as they contain a select number of options for the user to pick, they can all be optimized in different ways. The department configures the list of possible issue categories as a drop-down, because the list is too long to display well as a radio button or checkbox. The list of possible techs to be assigned is a shorter list, and multiple techs may be assigned to the same issue, so they have chosen to display the "Techs Assigned" field as checkboxes. Finally, an issue is either escalated or not escalated, so they are displaying that field as a radio buton.
List fields have the following properties:
-
Values: The list of values from which a user can choose.
-
Default value (optional): The default value of the list field that will be pre-selected in the template. If you do not set a default value, the default will be blank.
-
Sort option: Determines whether to sort the list of values in Ascending or Descending order. If you choose None, the list will be sorted in the same order as set in the field's properties.
-
Add "Other" choice: Determines whether users can specify an option not on your pre-defined list. You can specify a name for this option.
Show me examples
A veterinary office's pet information template asks for the species and breed of animals. The office handles primarily dogs and cats, but also accepts small mammal species, which can be specified with the "Other (small mammals only)" option.. In addition, the list of possible breeds to select from contains only the most common dog breeds for the area, but the "Other" option allows users to specify rarer dog breeds..
-
Display as dropdown: Allows you to display field values as a drop-down list even if originally configured as a radio button or checkbox.
Smart Fields
The Smart Fields feature allows you to configure your fields such that field values will be extracted from the document and populated in the field without manual user input, using Laserfiche AI. You can determine whether a particular field will allow automatic extraction with Smart Fields on a field-by-field basis. For example, you may want to automatically extract applicant information from a set of HR documents, but have members of the HR group manually set the application status field. This allows you to reduce the time users spend manually filling in fields where the information is present in the document, but still leave appropriate field population decisions in the hands of users.
A smart field is configured by selecting the Extract values with Smart Fields option when creating or modifying a field. The prompt that Laserfiche AI willl use to populate the field should then be stored in the field description. Examples of possible prompts that could be stored in the description:
-
An "Author" field with a description of "The document's author"
-
An "Application Date" field with a description of "The date of the application in year-month-day format"
-
A "Report Summary" field with a description of "A summary, of no more than 500 characters, of the report"
Smart Fields extraction can be performed manually or automatically. You can manually extract values using the Extract values option () when creating or modifying a document. Otherwise, by default field values will be extracted automatically when the template is applied, whether during document creation or on existing documents. Automatic text extraction will only happen if the field is blank; if a user has manually specified a value, it will not be overwritten. However, a user can choose to use the Extract values option to trigger extraction, which will overwrite existing values. This can also be used to update the field value if the text contents of the document have changed. Administrators can disable automatic Smart Fields extraction; see Enabling and Disabling Laserfiche AI Features for more information.
Field values will not be extracted automatically for documents that already have the template applied to them when the Extract values with Smart Fields option is configured. You can, however, initiate automatic extraction by switching the document to a template to a different template with Smart Fields, or by clearing the template and then re-selecting it once Smart Fields have been configured.
For more information, including security considerations, best practices, and other AI features, see Laserfiche AI.
Smart Fields with Classification
Smart Fields with Classification allows you to specify certain templates as eligible for automatic selection. Once one or more templates have been specified, users can choose to automatically select a template for a document, and the most appropriate template from that set will be selected. If no templates are deemed appropriate, no template will be selected. Templates that have not been marked as eligible for automatic selection will never be automatically selected and must be applied to documents manually.
For example, you might mark an invoices template, a purchase orders template, and an expense reports template as eligible for automatic selection. If a user chooses to automatically select a template, Laserfiche AI will return one of those three templates; if the document does not appear to be an invoice, purchase order, or expense report, no template will be returned. If the document is an employee application, but the employee application template has not been marked as eligible for automatic selection, it will not be selected. To ensure it is selected, you must mark that template as eligible.
Smart Fields with Classifications is enabled by selecting the Eligible for automatic selection with Smart Fields option when creating or modifying a tempate. The template description will be used to determine whether that template matches a given document. Examples of possible prompts that could be stored in the description:
-
An "Invoices" template with a description of "An invoice, containing items purchased and a total amount due."
-
An "Employment Application" template with a description of "An employment application for Company."
-
A "Annual Report" template with a description of "The year-end annual report for any year, with departmental subsections."
Smart Fields extraction can be performed manually or automatically. You can manually extract values using the Automatically select template and extract values option () when creating or modifying a document. Users can also select the <Automatically select template> option in the template selection list; this is useful when applying automatic template selection to a bulk import, and is also the way to use automatic template selection with other Laserfiche applications, such as Workflow or Snapshot. When this option is selected, the template will be selected when the document is saved.
Administrators can disable automatic template extraction; see Enabling and Disabling Laserfiche AI Features for more information.
Automatic template selection is only available when no template has been applied to a document. To use automatic template selection in this case, first manually remove the current template. Automatic template selection can be used with shortcuts to documents, but not with folders or shortcuts to folders.
For more information, including security considerations, best practices, and other AI features, see Laserfiche AI.
Multi-Value Fields
Fields may be configured to accept multiple values. For example, if a report may have multiple authors, the Author field may be configured to allow you to type more than one author name. Any value in a multi-value field can be searched on, regardless of its position in the field. Fields are marked as multi-value fields in Repository Administration. You can mark a field as multi-value when you create it, or you can modify an existing field to allow it to accept multiple values.
After the first value is typed into a multi-value field, a new line will appear below it, allowing you to type a second value for the field, and so on. To remove a value from a field, click the remove button to the right of the field value.
Multi-Value Field Groups
Multi-value field groups are groups of multi-value fields that are related in some way. When multi-value fields are collected into a multi-value field group, the first value for each field will be displayed together, and then the second value for each field will be displayed together, and so on. If a multi-value field is not part of a multi-value field group, all the values for the first field will be displayed together, and then all the values for the second field will be displayed together, and so on.
For example, you might store invoices in Laserfiche and include information about those invoices in the fields. An invoice might have multiple items on it, each of which has information that needs to be stored in the metadata: the item's name, product ID, quantity, and price. If you are not using multi-value field groups, each field will be listed separately, making it difficult to tell which product corresponds to which ID, quantity, and price.
However, if you are using multi-value field groups, multi-value fields will be arranged so that the first values of each member of the group are displayed together, making it easier to interpret the results.
You can define multiple multi-value field groups for a single template. Multi-value field groups can collect any fields in the template as long as they are multi-value fields, including dynamic fields. Multi-value field groups are specific to a particular template. If the fields also exist in another template, they will not automatically be collected as a multi-value field group in that other template.
Creating a Multi-Value Field Group
- Open repository management by selecting the app picker and then selecting Repository Administration.
- On the left, under Metadata, select Templates.
- Select the template to which you want to add a multi-value field group.
- On the Template Properties page, select the Multi-Value Field Groups tab.
- All multi-value fields in this template will be listed. In the Group option, click and select the group to which you want to assign the field. If you do not want to add a particular multi-value field to any group, leave the group set to No group.
Example: An organization's Invoices template contains seven multi-value fields: Product Name, Product ID, Price, Quantity, Customer Name, Customer Email Address, and Approved By. The administrator wants to group Product Name, Product ID, Price, and Quantity into one group named Product Information, Customer Name and Customer Email Address into a second group named Customer Contacts, and leave Approved By separate from the other groups. The administrator could do so by assigning the first four fields to Group 1, the second two fields to Group 2, and leaving the final field set to No group.
- Optional: In the Group Name option, click and type a name for the multi-value field group. This name will be displayed to users in the client.
- Click Save to save your changes.
Dynamic Fields
A dynamic field is a type of field in which the value of one field controls the values that a user can choose in another field. In a dynamic field, selecting a value for a parent field determines what value are available in the child fields. See Dynamic Fields for more information.
Field and Template Languages
You can configure an alternate language for the name of a field or template. When a user whose locale settings match that language views the template or field, they will see its name in the alternate language. If an alternate name has not been configured for a particular language, or the language isn't supported, the primary name (as configured in the General tab of the template or field's properties) will be displayed. For example, if a repository is primarily used by people who speak English, but some who speak Spanish or Arabic, the primary name could be set in English, with alternate names for Spanish and Arabic. If a repository is primarily used by people who speak French, but some who speak English or Chinese, the primary name could be set in French, with alternate names for Spanish and Arabic.
Alternate field and template names must be set manually for each field and template. Only the field or template name will be affected; field values are not affected by this setting.
Setting Alternate Field or Template Names
- Open repository management by selecting the app picker and then selecting Repository Administration.
- On the left, under Metadata, select Templates or Fields.
- Select the field or template to which you want to add an alternate name and select the Language tab.
- Under Language, select the language for which you want to configure an alternate name.
- Under Alternate Name, type the translation of the name.
- To add additional languages, select Add Language and then repeat steps 4-5.
- When you have configured all desired languages, click Save to save your changes.
Languages into which the client has been localized also support alternate language names. The supported languages are Arabic, Chinese (Traditional), Chinese (Simplified), English, French, Italian, Portuguese (Brazilian), and Spanish. Thai is also supported in the web client only.
Required Fields
A required field can never be blank. Whenever it is applied as part of a template, it must be filled in before you can save the document. There are two types of required fields:
-
Required for all templates: The field is required on all documents to which it has been applied, regardless of which template or templates they belong to.
-
Required for this template: The field is required when applied as part of the specified template, but can belong to other templates where it is not applied.
Required fields are marked with a red asterisk.
Field and Template Security
Administrators with the Manage Templates and Fields privilege can control who can see individual fields and templates on document. For more information, see Template and Field Access Rights.
Deleting a Field or Template Definition
To delete a field or template definition, select Metadata on the Repository Administration page and then select Fields or Template. Select the field or template you want to remove, and click the Delete button. This will permanently remove the field or template. The field or template will also be removed from all documents and folders that contained it.
Duplicating a Field or Template Definition
To duplicate a field or template definition in the web client, select the definition in the Fields section of the Repository Administration page and press the copy button. The field or template definition will be duplicated, and can be opened and modified.