Saving Documents to Laserfiche from Microsoft Office and Microsoft 365
This page describes how to save to the repository using either the Laserfiche Office Integration add-in for Microsoft 365, primarily used with the Laserfiche Repository Web Client, and the Office Integration plug-in, primarily used with the Laserfiche Repository Desktop Client. See the Laserfiche Office Integration page for additional details if necessary.
The Laserfiche Office Integration add-in for Microsoft 365
The Laserfiche Office add-in for Microsoft 365 lets you save a copy of an open Microsoft Word, Excel, or PowerPoint document directly to Laserfiche repositories.
Navigating the Laserfiche Office Integration add-in
Under the Home ribbon, use the Save to Laserfiche button to view the Laserfiche Office add-in.


Note: After an administrator provisions the add-in, you may find it by selecting the Add-ins button on the ribbon if it is not already on your ribbon.
While saving an Office document to Laserfiche, you can configure metadata about that document to categorize it or make it easier to search for in the future. See Metadata for more information.
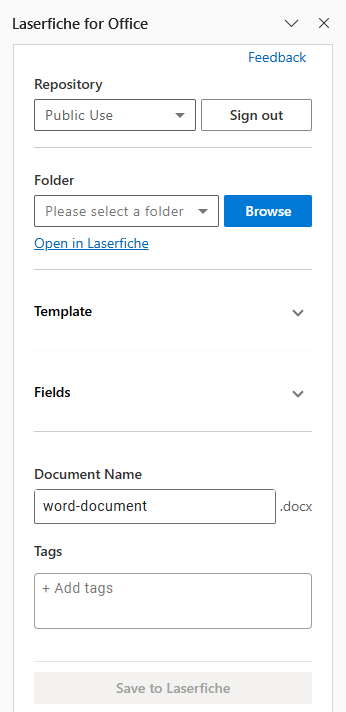
Click the Save to Laserfiche button to save the file.
After saving a copy to Laserfiche
To continue editing the version saved to Laserfiche, open the saved document from the Repository Web Client. The add-in provides links to the Laserfiche folder used, and to the saved document in the Web Client. See Working with Microsoft Office Documents for more information.
Saving a file that already exists (name conflicts & versioning)
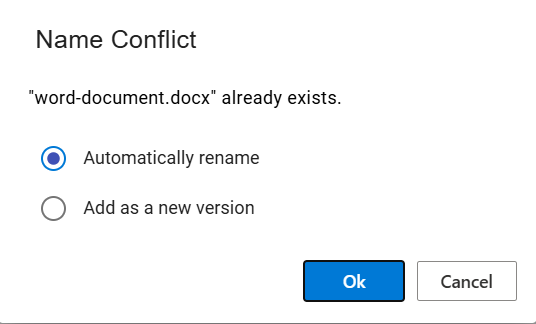
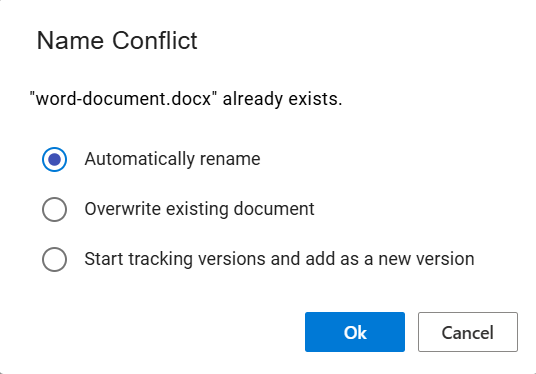
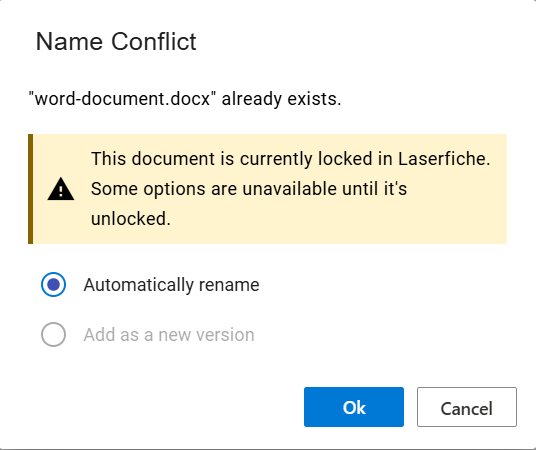
The Name Conflict dialog will appear when the destination folder already has a file with the same name. The options change depending on whether or not the file is locked (in use by another) and whether or not version tracking has been enabled.
-
When the file in Laserfiche is not locked and version tracking is enabled:
-
When the file in Laserfiche is not locked and version tracking is not enabled:
-
When the document in Laserfiche is locked and version tracking is enabled:
-
When the document in Laserfiche is locked and version tracking is not enabled:
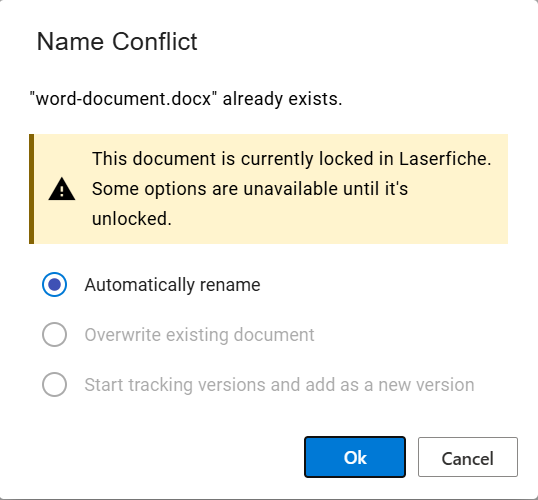
-
In the unlikely event that the item already in Laserfiche isn't a document (a folder, for instance), the only option will be to automatically rename the document.
Note: Enabling version tracking is immediate and cannot be undone.
Configuring Default Options
Default options for templates and fields can be set within Laserfiche at the user level.
- View the Options page in the Repository Web Client.
- Click on the New Document tab on the left.
- Make your changes under the Import Default / Default template section and click Save.
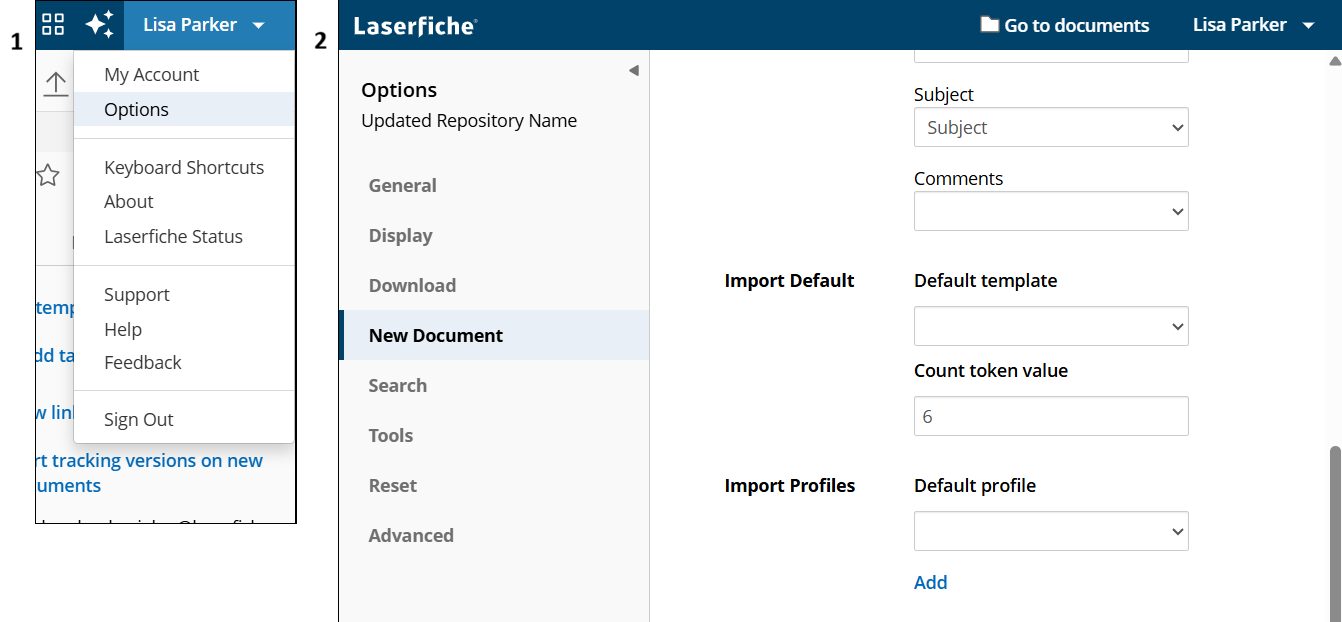
Note: The account administrator may have set account-wide defaults in the Repository Administration area. User's settings will overwrite the administrator's settings.
Troubleshooting
- If you encounter an "Application with the provided client id is not registered or authentication failed" message, contact your Laserfiche Administrator or IT Helpdesk. Refer to Installing the Laserfiche Office Integration add-in, in the section Connect the add-in to Laserfiche in the Developer Console.
Known Issue
Issue: Microsoft 365 issue 6949 - When using Word for the web, re-opening the add-in may result in the add-in not appearing.
Resolution:
- Refresh the browser window to resolve the issue.
Using the Laserfiche Office Integration plug-in
The Laserfiche Office Integration plug-in is a Laserfiche component that allows users to take advantage of Laserfiche features when working with Microsoft Word documents, Excel spreadsheets, PowerPoint presentations, and Outlook messages in their native Microsoft Office applications. The Office Integration plug-in allows you to save Office files directly to your repository from the Office ribbon or toolbar.
You can save any Microsoft Office file (except Outlook messages) to Laserfiche at any point: before you start, while you're working, or once it's finished.
Once you save to Laserfiche, you can continue to save your changes through the ribbon until you check the document in.
After checking in the document, you can re-open the document in the future from within the Web Client or Desktop Client. See Working with Microsoft Office Documents for more information.
Note: In addition to saving directly from within an Office application, you can also import Microsoft Office documents as you would any other file type. See Importing Files from Your Computer for more information.
Installing the Laserfiche Office Integration plug-in
If you have never used the Office Integration on your workstation before, you will need to install it before you can save documents to Laserfiche from Office:
- Open any Microsoft Office document in your repository. You will automatically be prompted to download and install the Office Integration.
- Download and run the installer.
- Once you have installed the Office Integration, you may be prompted to close any Microsoft Office applications you have open, and/or to restart your computer. If you are not prompted to do so, you will need to close and re-open your Office applications after installing.
Saving to Laserfiche
Once you have installed the Laserfiche Office Integration plug-in, you will see the Laserfiche ribbon or toolbar in your Microsoft Office applications. You can access the features of the plug-in from this ribbon or toolbar, including the Save to Laserfiche feature.
While saving an Office document to Laserfiche, you can configure metadata about that document to categorize it or make it easier to search for in the future. See Metadata for more information.
Note: Sending Microsoft Outlook email messages to Laserfiche has some additional features and options, and is covered in Sending Emails to Laserfiche from Microsoft Office. However, the same Laserfiche Office Integration plug-in installation is used for both, so you do not need to reinstall the Laserfiche Office Integration plug-in before using it with Outlook.
To save a document to your repository from Microsoft Word, Excel, or PowerPoint
- In the Office application, open the Laserfiche ribbon or toolbar. (You do not need to be logged in to Laserfiche in your browser.)
- Click Save to Laserfiche and select New Document.
- If you have not yet worked with an Office document using the Office Integration, you will be prompted to provide your Laserfiche URL. Type or paste the URL of your repository in the box, and click OK. (The URL will be of the form https://app.laserfiche.com/laserfiche/repo=r-000ab000, with 000ab000 replaced with your unique repository identifier. You can obtain your unique repository identifier by selecting your user name in the upper right corner of the Repository Web Client and selecting About.)
- You will be prompted to log in. Provide your user name and password, and click OK.
- Navigate to the folder in the repository where you want to save the document.
- To specify a new name for the document, type a name in the Name option. (By default, the file name will be used.)
- To specify a different file type, select the file type you want to save the document as from the Save as type option.
- Click Save. The Metadata dialog box will open.
- In the Fields tab, you can modify the template and field information for your new document. See Fields for more information.
- In the Tags tab, you can add tags to the document. See Tags for more information.
- Click OK to save your document to Laserfiche. You can continue working with your document and saving additional changes for as long as you like.